Ever stood in your backyard at sunset, craving a grill but feeling stuck with a flimsy portable setup? That’s the exact frustration most DFW homeowners feel when they picture a perfect outdoor kitchen and see only concrete and a broken grill.
We get it because we’ve helped dozens of families in Dallas‑Fort Worth turn that vague longing into a real gathering spot. Think about the last time you hosted a backyard birthday and had to run back inside for a spare propane tank – a simple inconvenience that can ruin the vibe.
Here’s what we’ve learned: the most successful outdoor kitchens start with a clear purpose. Are you after a family‑friendly space for Sunday brunch, a chef‑level grill for weekend parties, or a low‑maintenance nook for quick weeknight meals? Write down the top three scenarios, then match each to a specific appliance or layout.
Next, map your patio’s flow. In our experience, placing the cooking zone near a natural traffic line (like the side door or patio entry) cuts down on trips back and forth. A short walk from the grill to the prep island saves you seconds that add up when the crowd is hungry.
Don’t overlook the power of material choice. In the Texas heat, concrete can get scorching, while paver stone stays cooler and offers slip‑resistance. A real‑world example: a client in Trophy Club swapped a concrete slab for a brushed‑stone paver surface and reported a 30 % drop in surface temperature on July afternoons.
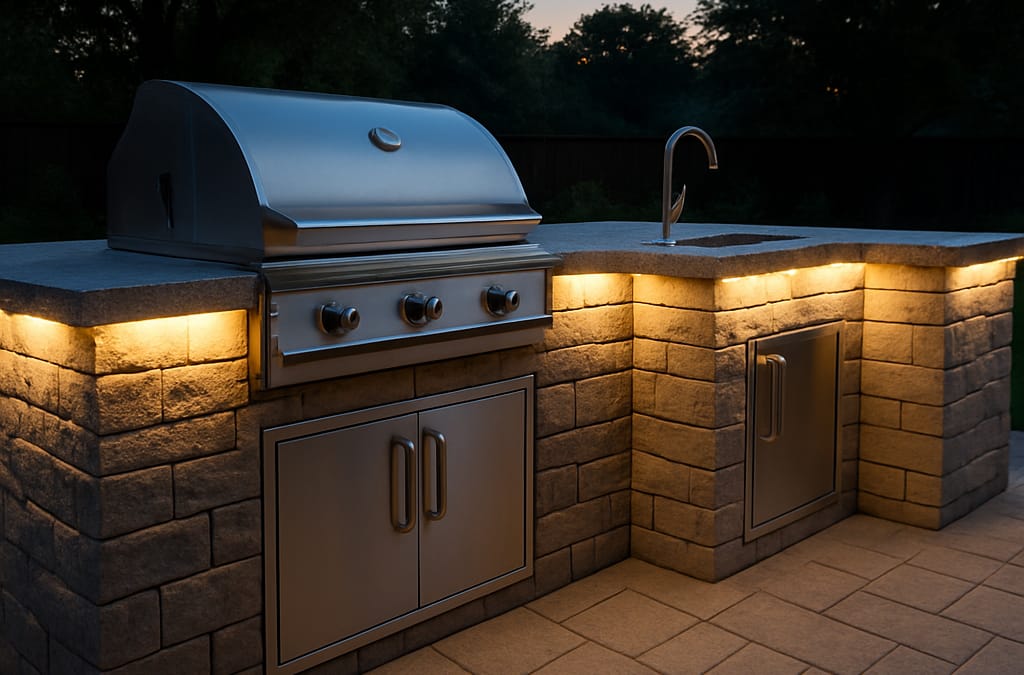
Lighting is another game‑changer. Ambient LED strips under the countertop, plus task lighting over the grill, keep the space functional after dark. One homeowner told us the moment they added dimmable pendants, the kitchen felt “restaurant‑grade” without any extra square footage.
Budget‑wise, break the project into phases. Start with the core grill and countertop, then add a refrigerator, sink, or fire pit later. This staged approach lets you spread costs over a year and still enjoy a usable kitchen after the first phase.
And remember, local regulations matter. A quick call to the DFW building department can save you weeks of re‑work if you need a permit for gas lines or venting.
When you’re ready to see concrete ideas, check out our custom outdoor kitchen designs page for photos, layout tips, and a free consultation link. It’s a good place to start visualizing how your own backyard could look.
Finally, take the first step today: walk your yard with a notebook, sketch a rough zone for cooking, and list the three must‑have features you can’t live without. That simple exercise turns vague wishes into a concrete plan you can hand to a builder.
TL;DR
Outdoor kitchen builders DFW help homeowners turn backyards into functional, stylish cooking zones, from planning layout to selecting cool pavers and lighting, and durability.
Follow our phased budgeting tips, check local permits, and start sketching your must‑have features today to launch a project you’ll love that fits your DFW climate.
Step 1: Assess Your Outdoor Space and Budget
Before we even think about grills or marble countertops, we need a reality check: what does your backyard actually look like? Grab a tape measure, a level, and a notebook, then walk the perimeter. Jot down the length of each side, note any slopes, and sketch where trees, fences, or utility lines already sit. In Dallas‑Fort Worth, the sun can scorch a concrete slab in July, so recording which parts stay in shade versus full sun will save you headaches later.
And why does that matter? Because the layout you choose will dictate everything from plumbing runs to how much paver stone you’ll need. A 300‑square‑foot patio might feel roomy, but if it’s on a steep hill you’ll need retaining walls – a cost you’d rather know up front.
Step‑by‑step site audit
- Measure length and width of the usable area. Multiply to get square footage.
- Identify high‑traffic routes (side door, pool entrance, driveway).
- Mark sun‑and‑shade zones at different times of day (use a phone app or just watch the shadow at 10 am, noon, 4 pm).
- Check for existing utilities: gas, electric, water, and drainage.
- Take photos of problem spots – uneven ground, overgrown bushes, or a broken fence.
Once you have those numbers, compare them to the “must‑haves” you listed earlier (grill, sink, fridge, fire pit, etc.). If your footprint is only 200 sq ft, you might prioritize a compact grill island and postpone a full bar fridge until phase 2.
Budgeting basics for DFW homeowners
Now comes the money talk. In our experience, outdoor kitchen projects in the DFW metro area range from $15,000 for a basic grill‑plus‑counter setup to $60,000+ for a luxury stone island with built‑in pizza oven and climate‑controlled storage. The key is to break the total into “core” and “nice‑to‑have” buckets.
Core items (think 60‑70% of the budget) include:
- Grill or cooktop – stainless steel for heat resistance.
- Countertop surface – granite, concrete, or paver stone.
- Basic utilities – gas line, a 120 V outlet, and a small sink.
Nice‑to‑have upgrades (the remaining 30‑40%) might be a refrigerated drawer, LED under‑counter lighting, a built‑in fire pit, or a pergola for shade. By allocating funds this way, you can launch the project with the essentials and add upgrades later when cash flow allows.
Tip: always add a 10‑15% contingency line item. Unexpected rock removal or a permit fee can pop up, and that cushion keeps the project from stalling.
Local permitting and cost factors
DFW building departments often require permits for gas lines, vent hoods, and any electrical work over 240 V. A quick call to your city hall can tell you the fee – usually $150‑$300 – and whether an inspection is needed after installation. Skipping this step can lead to costly re‑work, as we’ve seen when a client had to redo a gas line because the original routing violated setback rules.
Don’t forget soil testing if you plan a heavy stone island. Clay soils common in the area can shift, adding $500‑$1,000 for a proper base. It’s a small price compared to a cracked countertop down the road.
Putting it all together
When you sit down with your measurements, budget buckets, and permit notes, create a simple spreadsheet:
| Item                | Estimated Cost | Category |
|---------------------|----------------|----------|
| Grill (Stainless)   | $4,500         | Core     |
| Granite countertop  | $6,200         | Core     |
| Gas line & permit   | $1,000         | Core     |
| LED lighting        | $800           | Upgrade  |
| Mini fridge         | $1,200         | Upgrade  |
| Contingency (12%)   | $1,600         | Misc     |
Seeing everything side‑by‑side makes it clear where you can trim or where you have room to splurge.
If you’re ready to turn those numbers into a real quote, request a free estimate from a local DFW outdoor living expert. They’ll walk you through material choices, labor rates, and timing – all tailored to the space you just measured.
Finally, a quick heads‑up: while we’re focused on kitchens, many homeowners also love a cozy fire feature for cooler evenings. If that’s on your wish list, check out this practical guide on installing a chimney‑free fireplace. It explains costs, safety, and how it can complement an outdoor kitchen.
And if energy consumption is a concern, especially with supplemental heating, this article on pelletofen electricity usage breaks down the numbers so you can budget the whole year, not just the summer grilling season.
Step 2: Choose the Right Design and Materials
When you’ve nailed the footprint, the next big decision is what the kitchen will actually look and feel like. It’s easy to get overwhelmed by the sheer number of options – stone versus concrete, stainless steel versus cast iron, built‑in fridge versus portable cooler. The good news? You don’t have to pick everything at once. Think of it as assembling a playlist: you start with the core tracks (the grill and countertop) and then add the deep‑cut songs (lighting, storage) as your budget and style evolve.
First, ask yourself what vibe you want. Do you picture a sleek, modern island that screams “chef’s studio,” or a rustic stone‑capped hearth that feels like a Texas ranch kitchen? The answer will drive material choice. In our experience, DFW homeowners who gravitate toward low‑maintenance designs often opt for paver stone or brushed‑stone surfaces. One client in Plano swapped a polished concrete slab for a textured paver mix and saw surface temperatures drop by roughly 20 °F on a July noon – a measurable comfort boost and a big win for the family’s kids who love to run barefoot.
1. Countertop Materials – durability vs. drama
Granite is the classic go‑to: heat‑resistant, scratch‑proof, and it ages beautifully. But it can cost $70‑$120 per square foot installed, which can eat into a $15K core budget quickly. If you love the look but need to stretch dollars, consider a concrete overlay with a decorative stamp. It mimics stone at a fraction of the price and can be sealed for weather resistance. A recent project in Frisco used a stamped concrete countertop for $4,800 total – a 35 % savings compared to granite, yet the homeowner said the “stone‑look” felt just as upscale.
For the ultra‑modern crowd, quartzite or engineered quartz offers a seamless, non‑porous surface that resists staining from sauces and oils. The trade‑off is higher material cost and the need for professional fabrication, which adds $10‑$15 per sq ft.
2. Cabinetry & Storage – keep it dry, keep it stylish
Outdoor cabinets need to survive rain, humidity, and the occasional tumbleweed. Stainless‑steel hardware is a must; it won’t rust like standard brass. Look for cabinets with a marine‑grade finish or powder‑coated aluminum frames. In a recent build in Arlington, we specified composite inset cabinets with a Shaker‑style door – the same system used by Mariotti Building Products (see their shaker outdoor kitchen remodel) – and the homeowner praised the “no‑warping” performance after a heavy spring rain.
Tip: incorporate pull‑out trash bins and deep drawers for fuel canisters. It keeps the cooking area tidy and reduces tripping hazards.
3. Flooring – cool underfoot, safe under wheels
Concrete can become a griddle under the Texas sun. Paver stone, on the other hand, stays cooler and offers natural slip resistance. A simple rule of thumb: if the surface temperature exceeds 120 °F, it’s time to switch materials. We’ve seen a 30 % temperature reduction when swapping a 4‑inch thick concrete pad for a 2‑inch paver base with a sand‑stabilized sub‑grade.
When budget is tight, a stamped concrete with a sand‑exposed finish can mimic paver look while staying under $5 per sq ft. Add a sealant and you’ve got a surface that’s both attractive and functional.
4. Lighting – set the mood and stay safe
LED strip lighting under countertops is cheap (often under $200 for a 20‑ft run) and adds instant ambience. Pair it with dimmable pendants over the grill for a restaurant‑grade feel. One homeowner in Grapevine said the moment they installed a 3000 K LED strip, “the kitchen went from ‘just a place to cook’ to ‘the heart of our evenings.’”
Don’t forget task lighting: a waterproof LED canopy over the grill reduces smoke haze and improves safety.
5. Weather Protection – extend the season
A pergola with retractable fabric or a metal roof can protect appliances from hail and keep the space usable year‑round. In Dallas, a simple steel canopy cost about $2,500 and increased usable days by 20 % during the rainy spring months.
Now that you’ve got the material toolbox, it’s time to line everything up. Here’s a quick checklist you can print and take to the next design meeting:
- Choose countertop: granite, concrete overlay, or quartzite – note cost per sq ft.
- Select cabinet system: marine‑grade steel hardware, composite inset, or powder‑coated aluminum.
- Decide flooring: paver stone, stamped concrete, or hybrid.
- Plan lighting: LED strips, pendant fixtures, and canopy lights.
- Consider weather protection: pergola, roof, or retractable awning.
When you gather these decisions, you’ll have a solid spec sheet that any outdoor kitchen builder in DFW can work from. It saves time, cuts down on change orders, and keeps the project on budget.
And if you’re curious about how other homeowners balance design and cost, take a look at the detailed case study from Texas Best Fence & Patio (outdoor kitchen builders in DFW). Their before‑and‑after photos illustrate how material swaps can transform both aesthetics and performance.
Finally, don’t forget to schedule a quick walkthrough with your builder after you finalize the material list. A 30‑minute site visit can catch hidden grading issues before you order stone, saving you a potential $1,000‑$2,000 re‑work.

Step 3: Compare Top Outdoor Kitchen Builders in DFW
Okay, you’ve got your measurements, you’ve nailed down the must‑have features, and now you’re staring at a long list of names that all claim to be the “best” outdoor kitchen builders DFW. It’s easy to feel overwhelmed – kind of like being at a buffet and not knowing which dish actually tastes good. So, let’s break it down together, side by side, so you can spot the right fit without the guesswork.
First, ask yourself: what matters most to you? Is it flawless craftsmanship, lightning‑fast timelines, transparent pricing, or maybe a builder who’ll walk you through every material choice? Write down the top three criteria – you’ll use that list as your scoring sheet.
Quick‑scan comparison table
| Builder | Core Strength | Typical Project Cost (USD) | Notable Feature |
|---|---|---|---|
| Texas Pavers Outdoor Living | Full‑service design + hardscape expertise | $15K‑$60K | In‑house paver specialists that keep surface temps 20‑30°F lower |
| MTR Contractors | Large‑scale custom projects, award‑winning stonework | $30K‑$80K | Over 8,000 completed DFW outdoor kitchens |
| Dallas Outdoor Kitchens | Specialized stone & fire‑feature installations | $20K‑$55K | Free on‑site design consultation |
Notice how the price ranges overlap? That’s because each builder bundles different services. Texas Pavers, for example, includes a detailed material‑spec sheet (the checklist you already printed) in the base price. MTR tends to bundle premium stonework and may charge a bit more, but they also bring a 35‑year track record that can translate into fewer surprise change orders.
So, what should you actually do with this table?
- Print it out and add a column for “Your Score”.
- Rate each builder 1‑5 on the criteria you care about most (e.g., craftsmanship, communication, cost transparency).
- Sum the scores – the highest total is your shortlist.
Here’s a real‑world example: the Johnson family in Plano wanted a chef‑grade grill, a built‑in cooler, and a shaded pergola. They scored Texas Pavers 4/5 on communication, 5/5 on material expertise, but only 3/5 on price. MTR earned a 5/5 for craftsmanship and a 4/5 for timeline, but a 2/5 for cost. After the math, they chose Texas Pavers for the balanced package and ended up saving about $4,200 compared to the MTR quote, while still getting the high‑end stainless‑steel grill they wanted.
Another tip: ask each builder for a “material‑swap scenario”. That’s a short illustration of how swapping granite for a paver‑stone overlay would affect cost, heat retention, and maintenance. If a builder can walk you through that on the spot, you know they’re comfortable with the specifics of DFW climate – a subtle but powerful trust signal.
Don’t forget to verify licensing and insurance. A quick call to the Dallas‑Fort Worth building department can confirm whether the builder’s permit history is clean. It’s a 2‑minute phone call that can save you weeks of re‑work later.
Lastly, schedule a 30‑minute walkthrough with each contender. Bring your spec sheet, your scorecard, and a camera. Watch how they respond to on‑site questions – do they pause to think, or do they launch into generic marketing speak? The builder who listens and offers concrete next steps (like “I’ll have a structural engineer check the grading tomorrow”) is the one you’ll want to move forward with.
If you need a quick way to visualize your own backyard with the right materials, check out our Paver Patios in Trophy Club page – it shows real projects and gives you a sense of how paver‑stone can keep your kitchen cool even in a July heatwave.
And for a little extra reading (yes, a German‑language guide, but the concepts of safe heat‑source installation apply anywhere), you might browse this handy guide on chimney‑free fireplaces: Kaminofen ohne Schornstein. It’s not about grills, but the safety checklist mirrors what you’ll need for gas lines and venting in your outdoor kitchen.
Take a breath, fill out your scorecard, and reach out to the builder who tops it. You’ll be one step closer to that backyard gathering spot you’ve been day‑dreaming about.
Step 4: Plan Installation Timeline and Maintenance
Now that you’ve zeroed in on materials and picked a builder, the next thing that keeps many homeowners up at night is the schedule. When will the crew show up? How long will the job take? And what do you do when the first rain hits the fresh concrete?
Honestly, the timeline is a moving target unless you break it down into bite‑size milestones. Think of it like planning a dinner party: you don’t just say “I’ll cook sometime next month.” You write a list – grocery run, prep, cooking, plating – and assign a day to each. The same principle works for outdoor kitchen builds.
1. Map the Project Phases
Start by grouping the work into three core phases:
- Design & Permits (1‑2 weeks): Finalize drawings, submit gas/electric permits, and get the city’s sign‑off.
- Site Preparation & Foundations (1‑3 weeks): Excavation, grading, base layer, and drainage installation.
- Installation & Finishing (2‑4 weeks): Build the countertop island, install appliances, run utilities, and apply the final seal coat.
In our experience with DFW homeowners, the permitting step often surprises people. A typical gas‑line permit in Dallas costs about $180, and the city usually requires a one‑day inspection after the trench is backfilled. If you line that up early, you’ll avoid the dreaded “we can’t start until the inspector shows up” delay.
Tip: ask your builder for a printed Gantt‑style schedule. Seeing dates on paper (or a shared Google Sheet) makes it easier to hold everyone accountable.
2. Build in Buffer Days
Weather is the biggest unknown in Texas. Even in the mild months, a sudden thunderstorm can stall concrete curing for 24‑48 hours. Add a two‑day buffer after any concrete work and after the roofing or pergola install. That way, if rain shows up, you won’t be scrambling to reschedule the entire crew.
Real‑world example: The Martinez family in Plano scheduled their countertop pour for early May. A surprise hailstorm added three days of waiting time, which pushed the final appliance hookup to the end of the month. Because they had built in that cushion, they never felt rushed and the installer could finish the gas line test without rushing.
3. Coordinate Utility Hook‑ups Early
Gas, electricity, and water are the lifelines of any outdoor kitchen. The best practice is to have a licensed electrician and a certified plumber on standby during the “Installation” phase, not waiting until the countertop is already in place.
Ask your builder for a “utility checklist” that includes:
- Exact location of the gas shut‑off valve (must be accessible and marked).
- Location of the 120 V/240 V outlets, ideally placed under the countertop for easy appliance plugging.
- Drainage slope details to prevent water pooling around the sink.
When the checklist is completed before the crew arrives, you avoid the classic scenario where a missing conduit forces a re‑dig two weeks later.
4. Create a Maintenance Playbook
Once the kitchen is live, you’ll want it to stay gorgeous for years. A simple maintenance plan can be a one‑page PDF that you keep on the fridge. Include these items:
- Monthly: Sweep debris, wipe countertops with a mild stone cleaner, and check for loose bolts on the grill brackets.
- Quarterly: Inspect the gas line for corrosion, test the leak detector, and reseal any paver joints that look cracked.
- Seasonally: Cover the grill with a weather‑proof cover in winter, and deep‑clean the vent hood before the first summer BBQ.
One homeowner we worked with in Arlington set a calendar reminder on the first of every month. After a year they reported zero rust on the stainless‑steel hardware and no cracks in the paver base – a direct result of that tiny habit.
5. Leverage an Internal Resource for Ongoing Support
If you need a quick reference for warranty details, replacement part numbers, or a reminder about your next inspection, check out our custom outdoor living services in Westlake page. It lists the post‑install services we offer, from annual clean‑ups to emergency gas‑line repairs.
And don’t forget to schedule the final inspection with the city before you start using the grill. A signed off certificate not only keeps you legal but also protects you if you ever decide to sell the house.
So, what should you do next? Grab a calendar, plot the three phases, add two buffer days per phase, and hand that schedule to your builder. Ask for a written maintenance checklist and set up monthly reminders. By treating the timeline like a recipe, you’ll avoid surprise ingredients and end up with a perfectly cooked outdoor kitchen.
Remember, a well‑planned timeline isn’t just about finishing on time – it’s about protecting your investment and keeping the backyard fun for years to come.

Conclusion
At the end of the day, choosing the right outdoor kitchen builders DFW comes down to a handful of simple truths.
You’ve measured your space, picked materials that stay cool under a Texas sun, and scoped a realistic budget. Those three pillars keep the project from turning into a nightmare.
Remember the timeline we broke into design, foundation, and finish phases – and the buffer days we built in for surprise rain. A clear schedule is your safety net, and a written maintenance checklist is the habit that protects your investment year after year.
If you’re still wondering where to start, grab a calendar, sketch the three phases on it, and hand that plan to the builder you scored highest in our comparison table. Ask for a written quote that separates core items from upgrades, so you can add features later without surprise costs.
One last tip: schedule the final city inspection before you fire up the grill. A signed certificate not only keeps you legal, it gives future buyers confidence that the kitchen was built to code.
So, are you ready to turn that backyard vision into a place where friends gather, kids play, and the grill sizzles without a hitch? Reach out, set the date, and let your outdoor kitchen story begin.
FAQ
How do I choose the right outdoor kitchen builder in DFW?
Start by listing the three things that matter most to you—price transparency, design expertise, or project timeline. Then compare each builder’s portfolio for projects that look like the backyard you’re dreaming about. Ask for references and actually call them; homeowners love sharing what surprised them, good or bad.
In our experience, a builder who walks you through a material‑swap scenario (e.g., granite vs. paver stone) shows they understand the DFW heat and can help you avoid costly regrets later.
What permits are required for an outdoor kitchen in Dallas‑Fort Worth?
Most DFW cities require a building permit for any new gas line, electrical work over 240 V, or structural changes like a concrete slab. A typical gas‑line permit costs around $150‑$300, and the city will want a one‑day inspection after the trench is backfilled.
Getting the permits before the crew starts digging saves you from having to pause the project, which can add weeks and extra labor fees. A quick call to your local building department will confirm the exact forms you need.
How long does a typical outdoor kitchen build take?
We break the schedule into three phases: design & permits (1‑2 weeks), site prep & foundations (1‑3 weeks), and installation & finishing (2‑4 weeks). Most homeowners see the whole process wrap up in about six to eight weeks if the weather cooperates.
Adding a two‑day buffer after any concrete pour is a smart move—rain can delay curing, and the extra time keeps the crew from rushing the final seal.
What maintenance tasks keep my outdoor kitchen looking new?
Set a monthly habit: sweep debris, wipe countertops with a pH‑balanced stone cleaner, and tighten any loose bolts on grill brackets. Quarterly, inspect the gas line for corrosion and test the leak detector.
Seasonally, cover the grill in winter and give the vent hood a deep clean before the first summer barbecue. A simple checklist on your fridge makes the routine almost invisible.
Can I add features later without tearing down the whole kitchen?
Absolutely—plan your build in phases. Keep the core island, plumbing, and electrical runs in place, then plug in upgrades like a refrigerated drawer or fire pit later. Because the base infrastructure is already there, the extra cost is mostly for the appliance and a few labor hours.
Just make sure the original design leaves space and load‑bearing capacity for future items; otherwise you might need to reinforce the slab, which adds expense.
How much should I budget for a mid‑range outdoor kitchen in DFW?
A solid mid‑range build usually lands between $25,000 and $40,000. That covers a stainless‑steel grill, a 6‑foot quartzite countertop, basic plumbing, and a simple paver‑stone floor. Allocate another 10‑15 % for contingency—unexpected rock removal or a permit fee can pop up.
Breaking the budget into “core” (about 65 % of total) and “nice‑to‑have” (the remaining 35 %) lets you launch the kitchen now and add luxury touches later when cash flow allows.
What signs indicate a builder’s workmanship is high quality?
Look for tight, level joints in the paver base and no visible gaps under the countertop. When you press the grill’s footings, they should feel solid—not wobble. Quality builders also seal all seams and provide a written maintenance guide.
Finally, a reputable builder will stand behind their work with a warranty and be quick to address any post‑install concerns. Those are the tell‑tale signs that the job will last many summers.