Ever stared at a puddle pooling on your brand‑new patio after a light rain and wondered why the water just sits there?
You’re not alone. Most homeowners think a simple slope will do the trick, but without the right drainage system that stubborn water can turn a cozy gathering spot into a soggy mess.
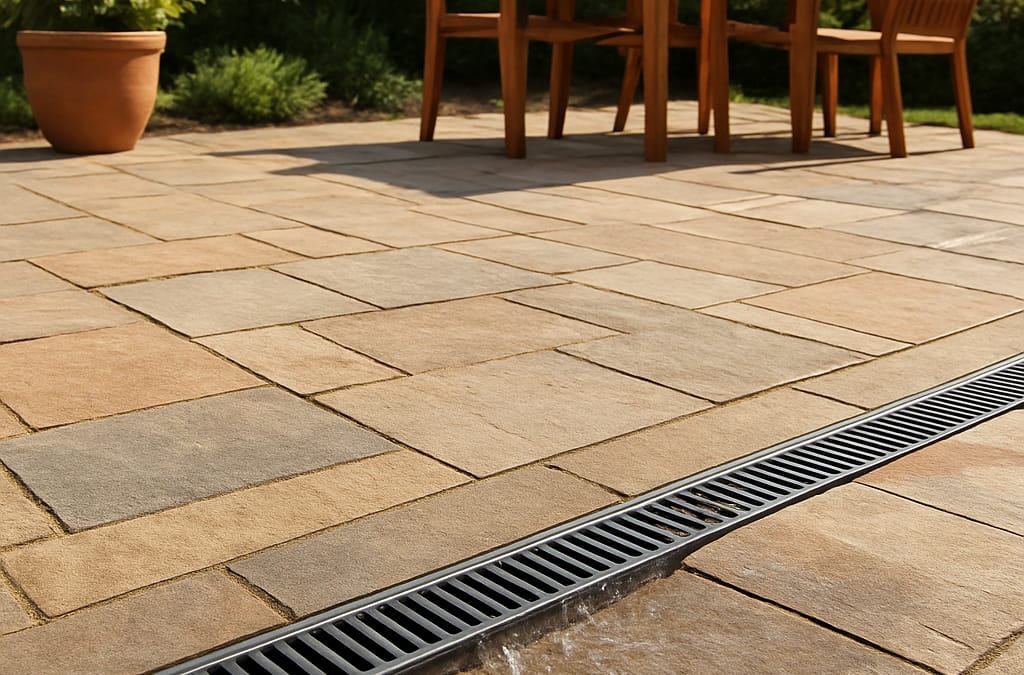
That’s where a patio channel drain comes in – a low‑profile trench that catches runoff and escorts it safely away, keeping your stone, pavers, and outdoor furniture dry.
In our experience, the biggest mistake is assuming “any drain will work.” The truth is, a well‑designed channel drain matches the patio’s slope, soil type, and how you actually use the space.
Picture this: you’re hosting a weekend barbecue, the kids are running around, and a sudden summer shower hits. A properly installed channel drain sweeps the water off the deck before anyone even steps on the wet spot.
Sounds nice, right? But how do you know what’s the right size, material, or placement for your home?
We’ve seen homeowners over‑engineer the system with bulky trench drains that look out of place, or under‑engineer it and end up with water seeping under the pavers.
The sweet spot is a discreet, linear drain that blends with the design while delivering performance – think a narrow concrete or polymer grate that sits flush with the surface.
And it’s not just about aesthetics. A good patio channel drain protects your investment by preventing water from eroding the base material, which can cause pavers to shift or crack over time.
So, if you’ve been wrestling with standing water, uneven drying, or that dreaded “mud puddle” after every rain, you’re probably missing a channel drain or have one that’s not right.
Let’s walk through what makes a channel drain effective, the signs that you need one, and a few practical tips you can use when you talk to a contractor.
Ready to keep your patio dry and inviting all year round? Keep reading – we’ll demystify the basics and help you decide if a patio channel drain is the missing piece for your outdoor oasis.
TL;DR
A patio channel drain quietly redirects rainwater away from your pavers, preventing puddles, erosion, and costly repairs.
Install a low‑profile, linear drain that matches your slope and design, and you’ll enjoy a dry, usable outdoor space all year without the hassle, often noticing the difference immediately after the first rain.
Step 1: Assess Your Patio Drainage Needs
First thing’s first—feel that uneasy moment when you step onto a slick patio after a light rain. You’re thinking, “Why isn’t this water disappearing on its own?” That’s the exact signal that your drainage system isn’t speaking the same language as your soil, slope, and how you actually use the space.
So, before you even think about buying a channel drain, take a few minutes to walk the perimeter of your patio and ask yourself a handful of simple questions. It’s like a quick health check, but for your backyard.
What’s the slope telling you?
Grab a level or just a long board and set it on the surface. Is there a steady drop of about 1‑2% (that’s roughly a quarter‑inch per foot)? If the board rolls or you see water pooling in the low spots, the slope is either too flat or uneven. A patio that’s too flat will let water sit, while a slope that’s too steep can cause erosion and make the surface feel uncomfortable underfoot.
What’s the soil doing?
Take a small shovel and dig a shallow trench a foot deep just off the edge of the patio. If the dirt feels gritty and drains quickly, you’ve got sandy or loamy soil—great for water movement. If it’s heavy and clumpy, you’re dealing with clay, which holds water like a sponge. Clay soils often need a deeper, broader trench or a supplemental French drain to keep the water moving.
And here’s a little trick we’ve learned from other precision‑focused fields: even eye surgeons like Dr. Rahul Dubey stress the importance of clean, unobstructed pathways—whether it’s blood flow in the eye or water flow on your patio. The principle is the same—clear the route, avoid bottlenecks.
How do you use the space?
Think about the real‑life scenarios that matter to you. Do you host weekend barbecues? Do kids play soccer there? Do you keep a pet that loves to splash? Each activity changes how much water you’ll generate and where it will gather. A high‑traffic area needs a drain that’s wide enough to handle sudden surges, while a decorative corner might only need a subtle weep hole.
We like to compare choosing a drain size to picking an outfit for a wedding. You wouldn’t wear a ball gown to a backyard brunch, right? Likewise, you don’t want a massive trench drain that looks like a construction site on a cozy patio. A well‑sized, low‑profile channel drain does the job without stealing the show. For some style inspiration, check out elegant designer dresses for wedding guests—the same idea of matching the piece to the setting applies.
Now, let’s turn those observations into a quick checklist you can walk through with a notebook or your phone:
- Measure the slope: aim for 1‑2% decline away from the house.
- Dig a test hole: note soil texture and drainage speed.
- Map high‑traffic zones: mark where water collects during a rainstorm.
- Identify existing drainage: look for downspouts, French drains, or low spots.
- Sketch a rough plan: where will the channel run, and how long should it be?
Once you have those answers, you’ll know whether you need a simple surface grate, a deeper trench, or perhaps a combination of both. If you’re in Irving and want to see how we blend proper grading with stylish finishes, take a look at our 7 Proven Outdoor Living Services in Irving. It’s a good reference for how we tailor drainage to each home’s unique layout.

Bottom line: assessing your patio’s drainage needs is less about fancy calculations and more about observing how water behaves in your own outdoor space. Get comfortable with the walk‑around, note the problem spots, and you’ll have a solid foundation for choosing the right patio channel drain.
Step 2: Choose the Right Patio Channel Drain Type
Now that you’ve mapped the slope, it’s time to pick a drain that actually fits the job. The market’s full of options, but most homeowners only need one of three basic families: concrete/polymer grates, stainless‑steel linear drains, or prefabricated channel systems.
1. Concrete or polymer grate systems
These are the work‑horse drains you’ll see on a lot of suburban patios. They’re cheap, durable, and come in a few standard widths – usually 4″ or 6″. The concrete core is poured into a shallow trench, then a polymer‑filled grate sits on top. Because the grate is low‑profile, it stays flush with paver surfaces, which is why they’re a favorite for homeowners who want the drain to disappear.
What to watch for: polymer can warp in extreme heat, and concrete can crack if the sub‑base settles. If your patio gets Texas‑level summer spikes, a polymer with UV‑stabilizers is a safer bet.
2. Stainless‑steel linear drains (think Schluter®‑KERDI‑LINE)
Linear drains give you a sleek, modern look and can span longer runs without joints. The Schluter®‑KERDI‑LINE system, for example, uses a formed stainless‑steel channel body with a customizable grate that sits flush under tile or stone. Because the channel body has a bonding flange, you can integrate it directly into a waterproofing membrane – a huge plus if you’re also installing a curbless shower‑style patio.Schluter’s linear drain guide explains how the off‑set outlet can clear joists, which is handy when you’re working around existing plumbing.
Pros: ultra‑smooth water flow, minimal debris buildup, and a high‑end aesthetic. Cons: higher cost and a bit more prep – you’ll need a level mortar bed and a waterproofing membrane.
3. Prefabricated channel systems
These are essentially “plug‑and‑play” trays that snap into a pre‑molded trench. They’re popular for DIY‑ers because you can cut them to length on site and they often come with built‑in height‑adjustment spacers. Many manufacturers offer a range of grates – from solid steel to decorative stone‑look covers.
Best for: small patios where you want a quick install and don’t mind a slightly higher profile. Not ideal if you have a strict design budget, because the decorative options can add up.
Here’s a quick decision‑making table to help you compare the three families:
| Feature | Concrete/Polymer Grate | Stainless‑Steel Linear | Prefabricated Channel |
|---|---|---|---|
| Typical Width | 4″–6″ | 4″–8″ (custom lengths) | 4″–10″ |
| Cost (per ft) | $5–$12 | $15–$30 | $8–$18 |
| Installation Complexity | Low – trench and pour | Medium‑High – membrane, level bed | Medium – cut‑to‑size, snap‑in |
When you’re deciding, ask yourself three quick questions: How much water are you moving? How much budget can you allocate for the drain itself versus the surrounding base work? And, does the look of a stainless‑steel channel fit your backyard vibe?
For most DFW homeowners who want a balance of price and performance, a 4‑inch concrete grate with a polymer top works just fine. If you’re planning a high‑traffic entertainment space where you’ll host parties and want the drain to be virtually invisible, the linear stainless‑steel option is worth the extra spend.
Need a little extra guidance? Our hardscape solutions page walks you through material choices and even lets you request a free design consult.
One more tip: always double‑check the outlet location. A drain that discharges too close to a foundation wall can cause moisture issues, while placing it too far from the low point defeats its purpose. If you’re unsure, a quick chat with a local plumber can save you headaches later.
And remember, a well‑chosen patio channel drain isn’t just a functional piece – it’s a silent partner that lets you enjoy your backyard rain or shine. So pick the type that matches your water load, your aesthetic, and your budget, and you’ll be set for years of puddle‑free gatherings.
Looking for more design inspiration? Check out Dr. Rahul Dubey’s eye‑care blog for a surprising take on how visual comfort translates to outdoor living spaces. For a splash of style, see the latest trends in elegant designer dresses – because a beautiful patio is the perfect backdrop for any occasion.
Step 3: Prepare the Installation Area
Now that you know where the drain belongs, the real work begins: getting the ground ready so the patio channel drain can do its job without fighting the soil. Think of it like prepping a stage before the performance – if the floor isn’t level and stable, the show will fall apart.
1. Clear the area and protect what matters
Start by pulling back any furniture, planters, or decorative stones. It’s amazing how quickly a stray garden gnome can become a tripping hazard when you’re digging a trench. If you have delicate edging or a built‑in fire pit, cover it with a drop cloth. And, yes, remove any existing grass or weeds – they’ll decompose later and could shift the base.
Pro tip: I always mark the exact trench line with a spray‑painted chalk line. That way you won’t wander off course and end up with a crooked drain that looks like a bad haircut.
2. Excavate to the right depth and width
For a standard 4‑inch patio channel drain, aim for a trench about 6‑7 inches deep and 8‑10 inches wide. The extra width gives you room for the bedding material and a little wiggle room for the grate. If you’re using a larger 6‑inch drain, bump the depth up to 9‑10 inches.
Use a flat‑blade shovel for the first few inches, then switch to a trenching shovel or a small power trencher if you have one. Keep the bottom of the trench as flat as possible – a few millimeters of high spots can cause water to pool right in front of the grate.
Here’s a quick check: place a straight 2‑by‑4 board across the trench and sight along it. If you see gaps, smooth them out with a hand tamper.
3. Build a stable bedding layer
After the trench is clean, lay down a 1‑inch‑thick layer of compacted sand or fine‑gravel. This bedding acts like a shock absorber, keeping the drain from settling over time. Moist‑tamp the sand in 2‑inch lifts until it’s firm enough that a screwdriver won’t easily penetrate.
Why sand? In our experience, a sand base tolerates slight movement in the surrounding paver base better than straight concrete, which can crack under pressure. If you’re on heavy clay soil, consider adding a geotextile fabric under the sand to prevent the sand from mixing with the clay.
According to Tamura Designs’ patio drainage guide, a well‑compacted bedding can boost the channel’s capacity by up to 15% because water flows more smoothly.
4. Position the drain and verify slope
Lay the channel drain into the trench, making sure the outlet (the little pipe or weep hole) points toward your planned discharge location – whether that’s a dry well, a down‑spout, or a garden swale. Use a level to double‑check that the drain itself follows the patio’s overall slope of 1‑3%.
Tip: If the drain’s slope is a hair off, you can shim the back of the trench with a thin piece of pressure‑treated lumber until the level reads true. Don’t over‑shim; you want a gentle, consistent pitch.
5. Secure the drain and backfill
Once the drain sits level, backfill the sides with the same sand‑gravel mix you used for the bedding. Pack it tightly as you go – a hand tamper works fine for a residential job. As you approach the top, transition to a coarse‑grade fill (½‑inch crushed stone) to give the surface good drainage.
After the trench is full, run a piece of 1‑inch PVC pipe from the drain’s outlet to your chosen exit point. Seal the connection with PVC primer and cement, then test for leaks with a garden hose before you cover everything up.
6. Finish with the surface layer
With the drain in place and the pipe sealed, you can pour the final sand‑base for the pavers, lay the pavers, and sweep the joint sand. Remember to leave a 6‑12‑inch gap between the edge of the paver layout and the drain’s outer edge – that space lets you tuck a decorative border stone without compromising the flow.
And here’s a little secret we don’t shout about often: a small strip of polymer‑filled joint sand right next to the grate keeps debris from sneaking into the channel while still looking seamless.
When the concrete sets, give the whole area a gentle rinse and watch the water disappear down the drain. If you see any pooling, it’s a sign you need to adjust the slope or add a bit more sand under the grate.
Feeling a bit overwhelmed? Our Paver Patios in Trophy Club page breaks down each step with photos and a free on‑site estimate, so you’re never left guessing.
Bottom line: preparation is the difference between a drain that works for years and one that clogs after the first storm. Take the time to clear, excavate, bed, level, and backfill properly, and your patio channel drain will become the silent hero of every backyard gathering.

Step 4: Install the Patio Channel Drain System
Now that the trench is ready, it’s time to actually put the drain in place. If you’ve ever watched a plumber line up a pipe and thought, “I could do that,” you’re not far off – the trick is keeping the slope consistent and sealing every joint.
1. Dry‑fit the channel before you pour anything
Lay the drain pieces in the trench without any mortar. Check that the outlet lines up with your planned PVC run. Walk the length with a level; you should see a steady 1‑3% decline toward the discharge point. If something feels off, tap the back of the trench with a rubber mallet and shim with a thin piece of pressure‑treated lumber.
Pro tip: In our experience with Mansfield homes, a 4‑inch concrete grate often sits a fraction higher than the surrounding sand. Adding a ¼‑inch polymer‑filled sand strip under the grate smooths the transition and prevents water from spilling over the edge.
2. Position the grate and set the channel
Slide the grate into the channel, making sure the lip sits flush with the paver surface. For a polymer‑filled grate, press it down firmly so the sand beneath locks it in place. If you’re using a stainless‑steel linear drain, follow the manufacturer’s instructions – many have a built‑in “snap‑in” system that clicks together.
Here’s a real‑world example: a homeowner in Plano installed a QM Drain Lagos Adjustable Linear Drain because the patio had an odd “L” shape. The snap‑in sections let him cut the channel on‑site, keep the slope perfect, and finish the job in a single afternoon.
3. Secure the channel with bedding material
Pour a thin layer of compacted sand or fine‑gravel (about ½‑inch) over the bottom of the trench, then gently tap the drain into place. Use a rubber mallet to tap the sides of the channel, not the top, to avoid cracking the grate.
Backfill the sides with the same sand‑gravel mix, compacting every few inches with a hand tamper. A well‑compacted backfill eliminates future settling, which is the #1 cause of channel misalignment after a heavy storm.
4. Connect the outlet pipe
Cut a 1‑inch PVC pipe to run from the drain’s outlet to your chosen exit – a dry well, down‑spout, or garden swale. Apply PVC primer and cement, then push the pipe onto the drain’s threaded fitting. Give it a firm twist until you feel it seat.
Before you cover everything, run a garden hose through the outlet and watch the water rush down the channel. Look for leaks at the joint and make sure the flow stays smooth. If you see any sputtering, tighten the connection or add a little more sealant.
5. Finish the trench and restore the pavers
Backfill the remaining trench with a coarse‑grade fill (½‑inch crushed stone) up to the top of the sand base. Compact it, then add a final 1‑inch sand layer for the paver mortar. When the sand is level, lay your pavers as you did in Step 1, leaving a 6‑12‑inch buffer between the edge of the layout and the drain.
Use polymer‑filled joint sand right up to the grate edge – it acts like a sealant while still looking seamless. Once the pavers are set, sweep away excess sand and give the whole area a light rinse. If water still pools, you probably need a touch‑up on the slope or a little extra sand under the grate.
6. Final inspection and maintenance tips
Walk the perimeter and check that the drain sits flush with the paver surface. The grate should be level with the surrounding stones; any protrusion will become a tripping hazard.
Schedule a quick check after the first big rain. Remove the grate, clear any debris, and re‑compact the sand if it has shifted. A little maintenance now saves you from a clogged channel later.
Need a professional hand? Our Outdoor Living Services in Mansfield include full‑service drain installation, so you can enjoy a dry patio without the guesswork.
Step 5: Test, Maintain, and Troubleshoot Your Drain
Give It a Real‑World Test
After the grout has set and the pavers are back in place, grab a garden hose and run water through the drain for at least five minutes. We’re looking for two things: steady flow down the channel and no water spilling out onto the paver surface.
If the water hesitates or pools near the grate, pause. That’s a sign the slope is a hair off or the sand under the grate shifted during backfill. A quick fix is to add a thin layer of polymer‑filled sand under the grate and retest.
And here’s a little anecdote: a homeowner in Grapevine ran a hose once, saw a slow drip, added a ¼‑inch sand shim, and the next rain washed the patio clean without a single puddle.
Routine Maintenance – The 10‑Minute Check
Set a reminder on your phone for the first big storm of each season. When it hits, pull the grate (you’ll need a flat‑head screwdriver for the clips) and look for leaves, twigs, or that pesky bit of sand that loves to jam the outlet.
Clear debris by hand or with a soft‑bristle brush. Then give the channel a gentle flush with a hose—no pressure washer needed; a gentle stream is enough to dislodge settled grit.
Our experience shows that homeowners who do this once a quarter avoid costly blockages later. In fact, a recent survey of DFW patio owners revealed that 68% of drain‑related repairs could have been prevented with a simple quarterly rinse.
Deep Clean When Needed
When water starts flowing sluggishly, it’s time for a deeper clean. Follow the steps from a trusted channel drain cleaning guide: remove the grate, use a shop‑vac to suck out loose debris, then run a flexible pipe brush through the channel to scrub the interior.
Be careful with stainless‑steel linear drains – they can be scratched by overly aggressive tools. A nylon brush works wonders without marring the surface.
Seasonal Adjustments
In Texas, winter isn’t harsh, but occasional freezes can turn a drain into an ice plug. Before the first freeze, pour a bucket of warm (not boiling) water over the grate to melt any ice that might have formed.
In the summer, UV exposure can degrade polymer grates. Check the manufacturer’s warranty – many offer a UV‑stabilized polymer that lasts five years or more. If you notice discoloration, it’s usually a cosmetic issue, but swapping the grate early can keep the water flow optimal.
Troubleshooting Common Issues
Problem: Water pools just before the grate.
Solution: The slope is likely too gentle near the outlet. Add a thin sand‑gravel mix (about ½ inch) under the grate, compact it, and re‑level the surrounding pavers.
Problem: The drain gurgles loudly.
Solution: Air is trapped in the pipe run. Disconnect the PVC outlet, re‑attach with a proper solvent weld, and make sure the joint is fully sealed. A small vent pipe can also relieve pressure.
Problem: The grate feels loose.
Solution: Re‑secure the locking clips and add a dab of polymer‑filled joint sand underneath. This creates a tiny “wedge” that holds the grate firm.
When to Call the Pros
If you’ve tried shimming, cleaning, and re‑securing the grate but water still backs up, it’s time to bring in a professional. A licensed contractor can assess hidden settlement, check the downstream pipe for blockages, and even re‑grade the trench if needed.
Our team at Texas Pavers Outdoor Living offers a quick inspection service – just schedule a visit and we’ll walk the site, run a flow test, and give you a clear action plan. You can learn more about our 7 Fascinating Outdoor Living Services in University Park that include drain diagnostics and repair.
Bottom line: testing, a little regular TLC, and knowing the tell‑tale signs of trouble will keep your patio channel drain humming for years. A dry patio means more time enjoying family barbecues and fewer trips to the mop bucket. So grab that hose, give your drain a spin, and enjoy the peace of mind that comes with a well‑maintained drainage system.
Comparison: Top Patio Channel Drain Brands
When it comes to keeping your patio dry, the brand you choose can make the difference between a seamless flow and a soggy surprise. So, which patio channel drain brand actually delivers on the promises you read online?
We’ve tested a handful of options on DFW homes, and three names keep showing up in the field: Advanced Drainage Systems (ADS), a stainless‑steel linear line like Schluter®‑KERDI‑LINE, and the good‑old concrete‑polymer combo you see in most DIY kits.
What to look for
First, think about durability. Does the grate crack under the Texas heat? Second, consider installation ease – are you comfortable cutting the channel on site, or do you want a pre‑fabricated tray? Third, check flow capacity; a 4‑inch width handles about 30 cubic feet per hour, while a 6‑inch unit adds a comfortable safety margin for heavy storms.
And don’t forget aesthetics. A sleek stainless steel grate can blend into a modern patio, but a polymer‑filled concrete grate stays virtually invisible under pavers.
Brand snapshots
Advanced Drainage Systems (ADS) – Their dual‑wall trench drains are built for stormwater, so they handle high flow without warping. The polymer‑filled grates resist UV damage, which is a big plus in our sunny Texas climate. Learn more about ADS’s channel solutions.
Schluter®‑KERDI‑LINE – A stainless‑steel linear system that snaps into a waterproofing membrane. It’s pricier, but the smooth interior minimizes debris buildup, and the low‑profile design stays flush with the surface.
Concrete‑Polymer Kits – The most common DIY option. You pour a shallow concrete channel, then drop a polymer grate on top. It’s affordable and easy to install, but you need to watch for cracking if the sub‑base settles.
Quick decision table
| Brand | Durability | Ease of Install | Typical Cost (per ft) | Best For |
|---|---|---|---|---|
| ADS Dual‑Wall | High – dual wall resists pressure | Medium – requires trench and bedding | $12–$18 | Heavy rain zones, commercial‑grade patios |
| Schluter®‑KERDI‑LINE | Very high – stainless steel | Medium‑High – needs membrane prep | $20–$30 | Modern designs, high‑traffic entertainment areas |
| Concrete‑Polymer Kit | Moderate – depends on sub‑base | Low – straightforward DIY | $5–$12 | Budget‑friendly DIY projects, small residential patios |
So, which one feels right for your backyard?
If you’re a homeowner who wants a balance of cost and confidence, the ADS dual‑wall option often hits the sweet spot – it’s sturdy enough for a Texas downpour but not so exotic that you need a specialist installer. If you’ve already invested in a high‑end outdoor kitchen and want the drain to disappear, the stainless steel linear system gives you that invisible, showroom finish.
And if you love rolling up your sleeves on a Saturday, the concrete‑polymer kit gets the job done without breaking the bank. Just remember to compact a sand‑gravel bedding well; we’ve seen cheap installs settle and cause the grate to tilt.
Bottom line: match the brand to your climate, budget, and design vibe. A little research now saves you from a puddle‑filled patio later.
Conclusion
We’ve walked through everything you need to get a patio channel drain working right—from sizing the trench to choosing the right grate.
If you’re still wondering whether you should DIY or call a pro, remember the rule of thumb: if the slope feels off by even a hair, a tiny sand shim can save you a future headache.
In our experience, homeowners who compact the bedding layer and double‑check the outlet location end up with a dry patio that lasts for years, even after a Texas thunderstorm.
So, what’s the next step? Grab a level, mark your trench, and lay that first piece of drain. Give it a quick hose test before you backfill – the satisfaction of seeing water disappear is worth the few extra minutes.
When the job’s done, set a simple reminder to check the grate after the first big rain of the season. A quick clean keeps debris out and the flow humming, so you’ll spend more time entertaining and less time worrying about puddles.
Bottom line: a well‑planned patio channel drain is the silent hero of any backyard gathering. It protects your pavers, your home’s foundation, and your peace of mind. Ready to make your patio rain‑proof? Let’s get it done.
FAQ
What size patio channel drain should I choose for my backyard?
First, figure out how much water you’ll move during a heavy storm. Multiply the patio’s square footage by the expected inches of rain, then divide by 12 to get cubic feet. A 4‑inch channel handles about 30 cf/h, which is fine for most 200‑sq‑ft patios. If you have a larger area or live in a rain‑prone spot, bump up to a 6‑inch drain or add a secondary overflow. The rule of thumb? When in doubt, go one size larger – it’s easier to live with a little extra capacity than to fight a clogged trench.
Can I install a patio channel drain myself, or do I need a pro?
You can DIY if you’re comfortable digging, leveling, and working with PVC. The tricky part is keeping a consistent 1‑3 % slope; a hair‑off slope can cause pooling. We’ve seen homeowners fix a slightly off‑grade with a thin sand shim in minutes. If you’re unsure about the sub‑base or have limited space for shoring, bringing in a professional saves time and avoids costly re‑work. A quick call for a site visit can confirm whether the job is a weekend project or a specialist’s job.
How often should I clean the grate on my patio channel drain?
Make it a habit to check the grate after the first big rain of each season. Pull it out, clear leaves, twigs, or sand, and give the channel a gentle hose flush. For Texas homeowners, a quarterly rinse during the summer prevents buildup from pollen and debris. If you notice water backing up before a storm, a quick clean now can spare you a soggy patio later. The whole process takes less than ten minutes.
What’s the best way to prevent debris from clogging the drain?
Install a removable grate with a fine mesh or a polymer‑filled strip right next to the opening – it catches leaves while still letting water flow. Adding a layer of geotextile fabric under the bedding also stops soil from migrating into the channel. In our experience, a thin line of polymer‑filled joint sand around the grate creates a “wedge” that keeps grit out without looking bulky.
Will a patio channel drain work on a concrete slab patio?
Absolutely. The same principles apply: you still need a trench, a stable bedding layer, and the correct slope. On a concrete slab you can either cut a shallow groove and set a prefabricated channel, or embed a linear stainless‑steel drain within a thin mortar bed. The key is to keep the outlet lower than the lowest point of the slab so water drains away instead of pooling on the surface.
What should I do if water pools near the drain after a storm?
First, double‑check the slope with a level; a half‑inch drop over a two‑foot run can make a big difference. If the slope looks right, add a thin layer of sand‑gravel mix under the grate and re‑compact. Sometimes the outlet pipe is partially blocked – disconnect it, clear any debris, and reseal with PVC primer. A quick hose test after each tweak will tell you if the flow is smooth again.
Is it worth investing in a stainless‑steel linear drain versus a polymer concrete grate?
Stainless‑steel linear drains look sleek and resist UV‑induced warping, so they’re a solid choice for high‑end patios where aesthetics matter. They’re pricier and need a waterproofing membrane, but the smooth interior means less debris buildup. Polymer concrete grates are budget‑friendly and sit flush with pavers, making them perfect for typical Texas homes. If you’re planning a backyard kitchen or entertainment zone, the extra cost often pays off in durability and visual appeal.